Azure Mobile App Service – Get personal info of the authenticated users — May 2, 2016

Azure Mobile App Service – Get personal info of the authenticated users

Hello everyone!


Introduction

Today, I was searching for an Azure Mobile Apps topic to write about in my blog, which I love, and I could barely find a blog post on the internet about how to get the user information like his name, his profile picture or even his friends (for more complex scenarios). So, I am gonna show you how you can easily fetch the personal info of an authenticated user of your UWP (and not only) application from Facebook, Google, Microsoft Account or Twitter.
Are you ready to create a great user experience for your users?


The result of this tutorial will be like:

Capture
I am gonna focus on the backend so I ‘ll keep the UI of the UWP App pretty simple & ugly.


You can find the complete project here. (GitHub)


Create a new Azure Mobile App backend

Follow these steps to create a new Mobile App backend.

  1. Log into the Azure Portal.
  2. In the top left of the window, click the +NEW button > Web + Mobile > Mobile App, then provide a name for your Mobile App backend.
  3. In the Resource Group box, select an existing resource group. If you have no resource groups, enter the same name as your app.At this point, the default App Service plan is selected, which is in the Standard tier. The App Service plan settings determine the location, features, cost and compute resources associated with your app. You can either select another App Service plan or create a new one. For more about App Services plans and how to create a new plan in a different pricing tier and in your desired location, see Azure App Service plans in-depth overview
  4. Use the default App Service plan, select a different plan or create a new plan, then click Create.This creates the Mobile App backend. Later you will deploy your server project to this backend. Provisioning a Mobile App backend can take several minutes; the Settings blade for the Mobile App backend is displayed when complete. Before you can use the Mobile App backend, you must also define a connection a data store.
(For this tutorial we are not going to use the database but you must define a connection to one in order to create the .NET Backend successfully.)

Configure the server project

  1. Back in the Mobile App backend settings, click Quick start > your client platform.
  2. Under Create a table API, select C#:

Click Download, extract the compressed project files to your local computer, open the solution in Visual Studio, build the project to restore the NuGet packages, then deploy the project to Azure. To learn how to deploy a .NET backend server project to Azure, see How to: Publish the server project in the .NET backend SDK topic.

You Mobile App backend is now ready to use with your client app.

(Taken from here)

Configure your Backend for Authentication

Now we have to configure our backend for authentication. There are some great guides for this on Azure Documentation.

Facebook

Please click here for Facebook Authentication configuration

Google

Please click here for Google Authentication configuration

Microsoft Account

Please click here for Microsoft Account Authentication configuration

Twitter

Please click here for Twitter Authentication configuration


Code code code!

Backend

We are ready to write some code for our backend!


Capture
That’s how a plain and clean Azure Mobile App project, downloaded from the Quick Start, is like.


Let’s create a new Controller.

  1. Right click on the Controllers folder
  2. Go to Add ->  Controller…
  3. Select Azure Mobile Apps Custom Controller
  4. Click the Add button
  5. Name it whatever you like ( I named mine UserInfoController.cs )
  6. Click Add


Azure Mobile Apps Custom Controller are Web API 2 REST-ful Controllers which are specialized in returning data to the client-consumer. They take care of transparently serializing the data into the format requested by the client. In our example, we will use it to get the user data, like his name and his profile picture, from the provider, like Microsoft, and return it to the client.


Now, as we created our Controller lets create our model class which will be returned to the user when our Controller is being invoked.

  1. So, right click on the DataObjects folder
  2. Add a new class.
  3. And name it whatever you like ( I named mine UserInfo.cs )


Place the following 2 properties inside our new class.


public class UserInfo
{
public string Name { get; set; }
public string ImageUri { get; set; }
}

view raw

UserInfo.cs

hosted with ❤ by GitHub


Open your Controller class and add the following code


[MobileAppController]
public class UserInfoController : ApiController
{
//Your Twitter Consumer credentials here. Twitter uses OAuth 1.1 so they are necessary.
const string TwitterConsumerKey = "<YOUR TWITTER CONSUMER KEY HERE>";
const string TwitterConsumerSecret = "<YOUR TWITTER CONSUMER SECRET HERE>";
/// <summary>
/// Returns the caller's info from the correct provider. The user who invokes it must be authenticated.
/// </summary>
/// <returns>The users info</returns>
public async Task<UserInfo> GetUserInfo()
{
string provider = "";
string secret;
string accessToken = GetAccessToken(out provider, out secret);
UserInfo info = new UserInfo();
switch (provider)
{
case "facebook":
using (HttpClient client = new HttpClient())
{
using (
HttpResponseMessage response =
await
client.GetAsync("https://graph.facebook.com/me&quot; + "?access_token=" +
accessToken))
{
var o = JObject.Parse(await response.Content.ReadAsStringAsync());
info.Name = o["name"].ToString();
}
using (
HttpResponseMessage response =
await
client.GetAsync("https://graph.facebook.com/me&quot; +
"/picture?redirect=false&access_token=" + accessToken))
{
var x = JObject.Parse(await response.Content.ReadAsStringAsync());
info.ImageUri = (x["data"]["url"].ToString());
}
}
break;
case "google":
using (HttpClient client = new HttpClient())
{
client.DefaultRequestHeaders.Authorization =
AuthenticationHeaderValue.Parse("Bearer " + accessToken);
using (
HttpResponseMessage response =
await
client.GetAsync("https://www.googleapis.com/oauth2/v2/userinfo&quot;))
{
var o = JObject.Parse(await response.Content.ReadAsStringAsync());
info.Name = o["name"].ToString();
info.ImageUri = (o["picture"].ToString());
}
}
break;
case "twitter":
//generating signature as of https://dev.twitter.com/oauth/overview/creating-signatures
string nonce = GenerateNonce();
string s = "oauth_consumer_key=" + TwitterConsumerKey + "&oauth_nonce=" +
nonce +
"&oauth_signature_method=HMAC-SHA1&oauth_timestamp=" +
DateTimeToUnixTimestamp(DateTime.Now) + "&oauth_token=" + accessToken +
"&oauth_version=1.0";
string sign = "GET" + "&" +
Uri.EscapeDataString("https://api.twitter.com/1.1/account/verify_credentials.json&quot;) +
"&" + Uri.EscapeDataString(s);
string sec = Uri.EscapeDataString(TwitterConsumerSecret) + "&" + Uri.EscapeDataString(secret);
byte[] key = Encoding.ASCII.GetBytes(sec);
string signature = Uri.EscapeDataString(Encode(sign, key));
using (HttpClient client = new HttpClient())
{
client.DefaultRequestHeaders.Authorization =
AuthenticationHeaderValue.Parse("OAuth oauth_consumer_key =\"" + TwitterConsumerKey +
"\",oauth_signature_method=\"HMAC-SHA1\",oauth_timestamp=\"" +
DateTimeToUnixTimestamp(DateTime.Now) + "\",oauth_nonce=\"" +
nonce +
"\",oauth_version=\"1.0\",oauth_token=\"" + accessToken +
"\",oauth_signature =\"" + signature + "\"");
using (
HttpResponseMessage response =
await
client.GetAsync("https://api.twitter.com/1.1/account/verify_credentials.json&quot;))
{
var o = JObject.Parse(await response.Content.ReadAsStringAsync());
info.Name = o["name"].ToString();
info.ImageUri = (o["profile_image_url"].ToString());
}
}
break;
case "microsoftaccount":
using (HttpClient client = new HttpClient())
{
using (
HttpResponseMessage response =
await
client.GetAsync("https://apis.live.net/v5.0/me&quot; + "?access_token=" +
accessToken))
{
var o = JObject.Parse(await response.Content.ReadAsStringAsync());
info.Name = o["name"].ToString();
}
}
using (HttpClient client = new HttpClient())
{
using (
HttpResponseMessage response =
await
client.GetAsync("https://apis.live.net/v5.0/me&quot; +
"/picture?suppress_redirects=true&type=medium&access_token=" +
accessToken))
{
var o = JObject.Parse(await response.Content.ReadAsStringAsync());
info.ImageUri = o["location"].ToString();
}
}
break;
}
return info;
}
/// <summary>
/// Returns the access token and the provider the current user is using.
/// </summary>
/// <param name="provider">The provider e.g. facebook</param>
/// <param name="secret">The user's secret when using Twitter</param>
/// <returns>The Access Token</returns>
private string GetAccessToken(out string provider, out string secret)
{
var serviceUser = this.User as ClaimsPrincipal;
var ident = serviceUser.FindFirst("http://schemas.microsoft.com/identity/claims/identityprovider&quot;).Value;
string token = "";
secret = "";
provider = ident;
switch (ident)
{
case "facebook":
token = Request.Headers.GetValues("X-MS-TOKEN-FACEBOOK-ACCESS-TOKEN").FirstOrDefault();
break;
case "google":
token = Request.Headers.GetValues("X-MS-TOKEN-GOOGLE-ACCESS-TOKEN").FirstOrDefault();
break;
case "microsoftaccount":
token = Request.Headers.GetValues("X-MS-TOKEN-MICROSOFTACCOUNT-ACCESS-TOKEN").FirstOrDefault();
break;
case "twitter":
token = Request.Headers.GetValues("X-MS-TOKEN-TWITTER-ACCESS-TOKEN").FirstOrDefault();
secret = Request.Headers.GetValues("X-MS-TOKEN-TWITTER-ACCESS-TOKEN-SECRET").FirstOrDefault();
break;
}
return token;
}
/// <summary>
/// Encodes to HMAC-SHA1 used by Twitter OAuth 1.1 Authentication
/// </summary>
/// <param name="input">The input string</param>
/// <param name="key">The input key</param>
/// <returns>The Base64 HMAC-SHA1 encoded string</returns>
public static string Encode(string input, byte[] key)
{
HMACSHA1 myhmacsha1 = new HMACSHA1(key);
byte[] byteArray = Encoding.ASCII.GetBytes(input);
MemoryStream stream = new MemoryStream(byteArray);
return Convert.ToBase64String(myhmacsha1.ComputeHash(stream));
}
/// <summary>
/// Returns the Unix Timestamp of the given DateTime
/// </summary>
/// <param name="dateTime">The DateTime to convert</param>
/// <returns>The Unix Timestamp</returns>
public static long DateTimeToUnixTimestamp(DateTime dateTime)
{
return (long) (TimeZoneInfo.ConvertTimeToUtc(dateTime) –
new DateTime(1970, 1, 1, 0, 0, 0, 0, System.DateTimeKind.Utc)).TotalSeconds;
}
/// <summary>
/// Generates a random number from 123400 to int.MaxValue
/// </summary>
/// <returns>A random number as string</returns>
public static string GenerateNonce()
{
return new Random()
.Next(123400, int.MaxValue)
.ToString("X");
}
}

Don’t forget to change the 2 const fields (line 5, 6) to your Twitter Consumer Key and Secret! (These are the two values you used when you set up your Mobile App with Twitter)


The above code reads the user’s access token which comes with every request he makes, invoking the correct endpoint for each provider using GET method and the right parameters, reads the user’s name and image URL and returns them to the user!

In this example,  we are just using these two values, but it’s more or less the same process for pretty much everything like the user’s friends or posts.

You just have to check the HTTP-based API for every provider (e.g. Facebook’s Graph API) to read about how and which endpoint to invoke and how the data is returned.


Application


Okay, we are ready to create our super simple UWP application to connect to our backend, get authenticated and use our custom Web API Controller!


Remember. The process for the other platforms is exactly the same! Just see the proper documentation on how to do the 3 things I mentioned above and you are done! No changes to the backend.


  1. Create a new UWP Project and name it whatever you like.
  2. Create a new folder and name it Models
  3. Create a new class and name it UserInfo.cs.
  4. Copy the following code inside it. It’s exactly the same model class as before.


public class UserInfo
{
public string Name { get; set; }
public string ImageUri { get; set; }
}

view raw

UserInfo.cs

hosted with ❤ by GitHub

  1. Right click on your UWP project and click Manage NuGet Packages.Select the Browse tab if it’s not already selected and search for Microsoft.Azure.Mobile.Client and install it.
  2. Open the MainPage.xaml
  3. Delete the root Grid
  4. Add the following code inside your Page element


<RelativePanel Background="{ThemeResource ApplicationPageBackgroundThemeBrush}">
<StackPanel Name="loginSp" RelativePanel.AlignHorizontalCenterWithPanel="True">
<TextBlock Margin="10" Style="{StaticResource HeaderTextBlockStyle}" Text="Login using.."></TextBlock>
<Button Margin="5" HorizontalAlignment="Center" Content="Facebook" Click="Login_Click"></Button>
<Button Margin="5" HorizontalAlignment="Center" Content="Google" Click="Login_Click"></Button>
<Button Margin="5" HorizontalAlignment="Center" Content="Microsoft Account" Click="Login_Click"></Button>
<Button Margin="5" HorizontalAlignment="Center" Content="Twitter" Click="Login_Click"></Button>
</StackPanel>
<StackPanel RelativePanel.AlignHorizontalCenterWithPanel="True" RelativePanel.Below="loginSp" Name="userSp">
<Image Width="100" Height="100" Name="userImage"></Image>
<TextBlock Style="{StaticResource SubheaderTextBlockStyle}" Name="userName"></TextBlock>
</StackPanel>
</RelativePanel>

view raw

MainPage.xaml

hosted with ❤ by GitHub


That’s our View.


5. Now, open MainPage.xaml.cs
6. Add the following code


public MobileServiceClient client;
public MobileServiceUser user;
public MainPage()
{
this.InitializeComponent();
}
protected override void OnNavigatedTo(NavigationEventArgs e)
{
base.OnNavigatedTo(e);
client = new MobileServiceClient("https://uwpstories.azurewebsites.net&quot;);
}
private async void Login_Click(object sender, RoutedEventArgs e)
{
Button button = sender as Button;
try
{
switch (button.Content as string)
{
case "Facebook":
user = await client.LoginAsync(MobileServiceAuthenticationProvider.Facebook);
break;
case "Google":
user = await client.LoginAsync(MobileServiceAuthenticationProvider.Google);
break;
case "Microsoft Account":
user = await client.LoginAsync(MobileServiceAuthenticationProvider.MicrosoftAccount);
break;
case "Twitter":
user = await client.LoginAsync(MobileServiceAuthenticationProvider.Twitter);
break;
}
}
catch (Exception)
{
}
if (user != null)
{
var userInfo = await client.InvokeApiAsync<UserInfo>("UserInfo",HttpMethod.Get,null);
userName.Text = userInfo.Name;
var httpclient = new HttpClient();
var bytes = await httpclient.GetByteArrayAsync(userInfo.ImageUri);
var bi = new BitmapImage();
await
bi.SetSourceAsync(
new MemoryStream(bytes).AsRandomAccessStream());
userImage.Source = bi;
}
}

Don’t forget to change the Mobile App URL of your MobileServiceClient (Line 12) (https is required!)

The above code uses the MobileServiceClient class to connect to our backend.

When you press any of the four buttons which are placed in our View (Facebook, Google, Microsoft Account, Twitter), client.LoginAsync is used and a new window opens and the selected provider will ask you for your credentials.

1


2


When you successfully log in, client.InvokeApiAsync<UserInfo> is used, our Controller is invoked and when the user’s name and image URI are available, they are returned back inside a UserInfo object.

Finally, we just present them on our view using a TextBlock and an Image!


3


That’s it! You can find the complete project here. (GitHub)

Thanks for reading and happy coding!

George


Did you find it useful? Write below!


Real-time chat application using Azure Mobile App and SignalR — February 21, 2016

Real-time chat application using Azure Mobile App and SignalR

Hello everyone!

I hope you are all well.

Introduction


ASP.NET SignalR is a library for ASP.NET developers that makes developing real-time web functionality easy. SignalR allows bi-directional communication between server and client. Servers can push content to connected clients instantly as it becomes available.

In this tutorial, I am gonna show you how you can create a real-time chat UWP application using Azure Mobile App and SignalR. You can easily implement cool features of Azure Mobile App like user authentication and push notifications along with SignalR bi-directional communication to create awesome real-time apps.


Create a new Azure Mobile App backend

Follow these steps to create a new Mobile App backend.

  1. Log into the Azure Portal.
  2. In the top left of the window, click the +NEW button > Web + Mobile > Mobile App, then provide a name for your Mobile App backend.
  3. In the Resource Group box, select an existing resource group. If you have no resource groups, enter the same name as your app.At this point, the default App Service plan is selected, which is in the Standard tier. The App Service plan settings determine the location, features, cost and compute resources associated with your app. You can either select another App Service plan or create a new one. For more about App Services plans and how to create a new plan in a different pricing tier and in your desired location, see Azure App Service plans in-depth overview
  4. Use the default App Service plan, select a different plan or create a new plan, then click Create.This creates the Mobile App backend. Later you will deploy your server project to this backend. Provisioning a Mobile App backend can take several minutes; the Settings blade for the Mobile App backend is displayed when complete. Before you can use the Mobile App backend, you must also define a connection a data store.
(For this tutorial we are not going to use the database but you must define a connection to one in order to create the .NET Backend successfully.)

Configure the server project

  1. Back in the Mobile App backend settings, click Quick start > your client platform.
  2. Under Create a table API, select C#:

Click Download, extract the compressed project files to your local computer, open the solution in Visual Studio, build the project to restore the NuGet packages, then deploy the project to Azure. To learn how to deploy a .NET backend server project to Azure, see How to: Publish the server project in the .NET backend SDK topic.

You Mobile App backend is now ready to use with your client app.

(Taken from here)

Now, we are ready to install SignalR package to our Mobile App.

Right Click your Mobile App project and click Manage NuGet Packages… as shown below.

1

Select the Browse tab if it’s not already selected and search for SignalR and select Microsoft.AspNet.SignalR package. Then click Install

2

Click OK to the first popup and accept the second one.

It should now create a Scripts folder.

Ready to write some code?

Create a ChatMessage.cs class inside the DataObjects folder.

Add the following code.


public class ChatMessage
{
public string Username { get; set; }
public string Message { get; set; }
}

view raw

ChatMessage.cs

hosted with ❤ by GitHub


Create a new folder under your project’s root and name it whatever you want. I named mine Hubs.

Create a new class inside your folder named ChatHub.cs.

Add the following code.


public class ChatHub : Hub
{
public void Send(ChatMessage message)
{
Clients.All.broadcastMessage(message);
}
}

view raw

ChatHub.cs

hosted with ❤ by GitHub


The SignalR Hubs API enables you to make remote procedure calls (RPCs) from a server to connected clients and from clients to the server. In server code, you define methods that can be called by clients, and you call methods that run on the client. In client code, you define methods that can be called from the server, and you call methods that run on the server. SignalR takes care of all of the client-to-server plumbing for you.

  • void Send(ChatMessage message) will be invoked by the clients
  • Server will broadcast this message to every  connected client by Clients.All.broadcastMessage(message)

Simple right?

Last but not least, open the Startup.cs class which is located in your project’s root and add app.MapSignalR(); below ConfigureMobileApp(app);

This will map SignalR to the app builder pipeline.

And that’s it! Your mobile app service is ready.


Create your UWP Client Application


Let’s create our UWP Application.

Start by creating a new project by going to File->New->Project->Visual C#->Windows and select Blank App (Universal Windows) and name it whatever you want.

Then, right click your UWP project and click Manage NuGet Packages… like before.

Select the Browse tab if it’s not already selected and search for SignalR and select Microsoft.AspNet.SignalR.Client package this time. Then click Install


When it’s ready, create the same ChatMessage.cs class like before and place it wherever you want.

I am gonna use a simple data binding mechanic. If you need more info on what data binding is start here.

Create a class named ChatMessageViewModel.cs this will be used to represent our Chat Messages on our view.


public class ChatMessageViewModel
{
public ObservableCollection<ChatMessage> Messages { get; set; } = new ObservableCollection<ChatMessage>();
}


Then, open App.xaml.cs and declare the following public variables


public ChatMessageViewModel ChatVM { get; set; };
public HubConnection conn { get; set; }
public IHubProxy proxy { get; set; }

view raw

App.xaml.cs

hosted with ❤ by GitHub

Add the following code inside the App.xaml.cs


public App()
{
this.InitializeComponent();
this.Suspending += OnSuspending;
SignalR();
}
public void SignalR()
{
conn = new HubConnection("http://<your-mobile-app&gt;.azurewebsites.net");
proxy = conn.CreateHubProxy("ChatHub");
conn.Start();
proxy.On<ChatMessage>("broadcastMessage", OnMessage);
}
public void Broadcast(ChatMessage msg)
{
proxy.Invoke("Send", msg);
}
private async void OnMessage(ChatMessage msg)
{
await Windows.ApplicationModel.Core.CoreApplication.MainView.Dispatcher.RunAsync(CoreDispatcherPriority.Normal, () =>
{
ChatVM.Messages.Add(msg);
});
}

view raw

App.xaml.cs

hosted with ❤ by GitHub


This will create the connection to our mobile app service, connect to our ChatHub
and register to broadcastMessage event which means, when the server sends a broadcastMessage message to us, OnMessage handler will be invoked.

The OnMessage handler adds the received message to our ObservableCollection, Messages, and the Broadcast method is used to send the message to our service by invoking the server-side Send method.

Our Logic is ready!

Now, the only thing left is creating our View. Let’s use the MainPage for that.


<Page
x:Class="ChatApplication.MainPage"
xmlns="http://schemas.microsoft.com/winfx/2006/xaml/presentation&quot;
xmlns:x="http://schemas.microsoft.com/winfx/2006/xaml&quot;
xmlns:local="using:ChatApplication"
xmlns:d="http://schemas.microsoft.com/expression/blend/2008&quot;
xmlns:mc="http://schemas.openxmlformats.org/markup-compatibility/2006&quot;
mc:Ignorable="d"
>
<RelativePanel>
<TextBox x:Name="name" RelativePanel.AlignRightWithPanel="True" RelativePanel.AlignLeftWithPanel="True" RelativePanel.AlignTopWithPanel="True"></TextBox>
<ListView x:Name="lv" ItemsSource="{Binding Messages}" RelativePanel.Above="rp" RelativePanel.AlignLeftWithPanel="True" RelativePanel.AlignRightWithPanel="True" RelativePanel.Below="name">
<ListView.ItemTemplate>
<DataTemplate x:DataType="local:ChatMessage">
<StackPanel Orientation="Horizontal">
<TextBlock>
<Run Text="{x:Bind Username}"></Run>
<Run Text=": "></Run>
<Run Text="{x:Bind Message}"></Run>
</TextBlock>
</StackPanel>
</DataTemplate>
</ListView.ItemTemplate>
</ListView>
<RelativePanel x:Name="rp" RelativePanel.AlignBottomWithPanel="True" RelativePanel.AlignLeftWithPanel="True" RelativePanel.AlignRightWithPanel="True">
<TextBox x:Name="text" RelativePanel.AlignLeftWithPanel="True" RelativePanel.LeftOf="send" ></TextBox>
<Button x:Name="send" RelativePanel.AlignRightWithPanel="True" Content="Send" Click="send_Click"></Button>
</RelativePanel>
</RelativePanel>
</Page>

view raw

MainPage.xaml

hosted with ❤ by GitHub

That’s my super simple View. I am using a TextBox for the username, a ListView for the messages, which uses the Messages ObservableCollection as it’s ItemSource, one more TextBox for the message we would like to send and a Button.


public MainPage()
{
this.InitializeComponent();
this.DataContext = (Application.Current as App).ChatVM;
}
private void send_Click(object sender, RoutedEventArgs e)
{
(Application.Current as App).Broadcast(new ChatMessage {Username = name.Text, Message = text.Text});
}

And that’s the MainPage code behind the view.

I am just setting the DataContext of the MainPage to our ChatMessageViewModel and invoking the Broadcast method when the user clicks the button.

And voila! That’s it!

Capture

Of course, you can follow the same logic to improve it with features like who’s online right now or private messaging. Also, you can even use push notifications and user authentication offered by Azure Mobile Apps easily.

You can find the GitHub repo here.

Thanks for reading!
George

HC-SR04 Ultrasonic Sensor on Raspberry Pi 2 — December 2, 2015

HC-SR04 Ultrasonic Sensor on Raspberry Pi 2

Hello everyone,

today I was playing with my new Raspberry Pi 2 running Windows 10 IoT Core and I am pretty excited about the way it works and how awesome it is to build apps for it.
I am going to use it to build a maze solving robot for ITU Robot Competition which takes place in Istanbul, Turkey every year.

What will we need?

  • Raspberry Pi 2
  • HC-SR04 Ultrasonic Sensor
  • Breadboard
  • Female-to-Female Jumper Wires
  • Resistor 1kΩ
  • Resistor 2kΩ


What is a Raspberry Pi?

The Raspberry Pi is a computer that is very cheap and quite small. It has hardware pins called GPIO pins that allow you to connect all manor of sensors, control boards, and other things. The GPIO pins can then be accessed directly by your code.

RP2_Pinout.png
Here is a super useful image showing every pin usage on Raspberry Pi 2.


What is an HC-SR04 Ultrasonic Sensor?

It’s a cheap sensor that can be used to measure the distance between itself and an object in front of it by sending an ultrasonic pulse and listening for its echo. The HC-SR04 can be connected to many things including the Raspberry Pi.

hc-sr04.jpg


Why do I need the resistors?

The sensor’s output signal (ECHO) is rated  at 5V. However, the input pins on the Raspberry Pi GPIO are rated at 3.3V.
Sending a 5V signal into that unprotected 3.3V input pin could damage the GPIO pin of the Raspberry Pi 2, which is something we want to avoid! We’ll need to use a small voltage divider circuit, consisting of two resistors, to lower the sensor output voltage to something our Raspberry Pi can handle.

A voltage divider consists of two resistors (R1 and R2)hc-sr04-tut-1 
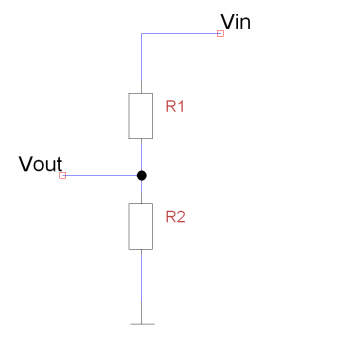
in series connected to an input voltage (Vin), which needs to be reduced to our output voltage (Vout). In our circuit, Vin will be ECHO, which needs to be decreased from 5V to our Vout of 3.3V.


  • Hardware part

There are four pins on the HC-SR04 sensor. The pin labelled VCC requires connecting to a 5V pin, the pin labelled “Gnd” requires connecting to a ground pin, and the pins “Trig” and “Echo” need to be each wired to a unique GPIO pin on the Raspberry Pi.

I am going to use the following pins:

VCC -> 2nd pin
TRIG-> 12th pin
ECHO-> 16th pin
GND -> 6th pin

rpi2hcsr04_bb.png
Here is a simple demonstration on how to wire up your Raspberry Pi 2 with HC-Sr04 sensor.


I think it is pretty straight-forward (and I am not a hardware guy 🙂 ) so I am gonna leave it as it is, hope you don’t mind.


  • Software part

Here is the easy, yet cool part. Note that, you can use the exactly same code for every board running Windows 10. ( Raspberry Pi 2, MinnowBoard Max, DragonBoard410c)

Developing for Windows 10 on these boards gives us a bunch of options. From UWP App (which I am going to build today) to Express Node.js Web App.

The first thing you have to do is to setup your environment. I am not going to dive into this as there is a detailed tutorial on Microsoft IoT GitHub page, HERE.

Assuming that you have already set up your environment, it’s time to start coding!

First, let’s create a new Blank Universal Windows App by going to

File -> New -> Project -> Installed -> Visual C# -> Windows -> Universal -> Blank App (Universal Windows)

You can name it as you like, I named it IoTUltrasonicApp.1.PNG


Now you have to add a reference to Windows IoT Extensions for the UWP in your newly created project. Right click on the References section and click Add Reference… Then you will find it under

Universal Windows -> Extensions

Click on Windows IoT Extensions for the UWP tick it and press OK.

Capture1.PNG


Time to add two TextBlocks to our MainPage.xaml file. The one of them will be used to present the calculated distance and the other to present the status of the our GPIO Controller / Pins. I just drag ‘n’ drop them somewhere on my page.

2.PNG

Here is the code of my Grid for a quick copy / paste.


&amp;amp;amp;lt;Grid Background="{ThemeResource ApplicationPageBackgroundThemeBrush}"&amp;amp;amp;gt;
&amp;amp;amp;lt;TextBlock x:Name="gpioStatus" FontSize="20" HorizontalAlignment="Left" Margin="10,531,0,0" TextWrapping="Wrap" Text="Status" VerticalAlignment="Top"/&amp;amp;amp;gt;
&amp;amp;amp;lt;TextBlock x:Name="distancetb" FontSize="20" HorizontalAlignment="Left" Margin="453,299,0,0" TextWrapping="Wrap" Text="0" VerticalAlignment="Top"/&amp;amp;amp;gt;
&amp;amp;amp;lt;/Grid&amp;amp;amp;gt;

Now, let’s open MainPage.xaml.cs.


Use the following namespaces


using Windows.Devices.Gpio;
using System.Threading.Tasks;
using System.Diagnostics;


Let’s declare our variables and constraints. I am gonna explain them all soon.


private const int ECHO_PIN = 23;
private const int TRIGGER_PIN = 18;
private GpioPin pinEcho;
private GpioPin pinTrigger;
private DispatcherTimer timer;
private Stopwatch sw;

The 2 int constraints are the number of the pins (something like ID) I use for the echo and the trigger I/O of my ultrasonic sensor. You can find them in the raspberry image above. (GPIO X, the X is the number we need.)

The GpioPin objects represents the pins we will use to write to and read from the sensors.

Also, we are going to compute the distance frequently so we need a timer. For that purpose I am gonna use a DispatherTimer.

The Stopwatch is going to be used to calculate the distance.


public MainPage()
{
this.InitializeComponent();

InitGPIO();

timer = new DispatcherTimer();
timer.Interval = TimeSpan.FromMilliseconds(400);
timer.Tick += Timer_Tick;
if (pinEcho != null &amp;amp;amp;amp;amp;&amp;amp;amp;amp;amp; pinTrigger != null)
{
timer.Start();
}

}

We first initialize our GPIO, and if the initialization is successful, we start our timer at 400ms interval.


private async void InitGPIO()
{
var gpio = GpioController.GetDefault();
if (gpio == null)
{
pinEcho = null;
pinTrigger = null;
gpioStatus.Text = "There is no GPIO controller on this device.";
return;
}

pinEcho = gpio.OpenPin(ECHO_PIN);
pinTrigger = gpio.OpenPin(TRIGGER_PIN);

pinTrigger.SetDriveMode(GpioPinDriveMode.Output);
pinEcho.SetDriveMode(GpioPinDriveMode.Input);
gpioStatus.Text = "GPIO controller and pins initialized successfully.";

pinTrigger.Write(GpioPinValue.Low);

await Task.Delay(100);
}

Here, we get the default GpioController and check if it null. If it is, something is wrong with our board and we can’t communicate with it’s GpioController. If it isn’t, we open the echo and the trigger GPIO in order to use them. We set the DriveMode of the Trigger and Echo pins to Output and Input respectively. That means that we are going to write to the Trigger pin and read from the Echo one. Then, we just turn Trigger off by writing GpioPinValue.Low to it and we wait for 100ms.


And now the tricky part.

private async void Timer_Tick(object sender, object e)
{
pinTrigger.Write(GpioPinValue.High);
await Task.Delay(10);
pinTrigger.Write(GpioPinValue.Low);
sw.Start();
while (pinEcho.Read() == GpioPinValue.Low)
{

}

while (pinEcho.Read() == GpioPinValue.High)
{
}
sw.Stop();

var elapsed = sw.Elapsed.TotalSeconds;
var distance = elapsed * 34000;

distance /= 2;
distancetb.Text = "Distance: " + distance + " cm";
}

To calculate the distance, some things need to be done in the following order.

  1. Turn the Trigger on to send an ultrasonic wave, wait a bit and turn it off. The ultrasonic wave should hit an object and come back to the sensor.
  2. Start the timer and wait for the ultrasonic wave to come back to the sensor.
  3. Stop the timer when Echo doesn’t have anything more to read.
  4. Multiply the elapsed time with the speed of sound (in cm/s) at sea level.
  5. Divide by 2 because the ultrasonic wave traveled the current distance twice.
  6. Voila, we set the text of our TextBlock to the text we need.


Capture.PNG

That’s it!
Now, you can start playing with your board and create amazing IoT and Robotics things.

Don’t forget to comment below.
Here is my project hosted on GitHub.

I will probably write more IoT and Robotics tutorials like this one in my spare time on my blog or on StudentGuru Tutorials.

Till then, happy coding!

PS. Sorry for bad code formatting, it’s WordPress not me!

Thanks for reading!

George


Create streaming enabled videos in UWP Applications — August 9, 2015

Create streaming enabled videos in UWP Applications

Hello everyone,
hope you’re all enjoying the summer!

In one of my new apps (yep, I love building apps on UWP Platform), I wanted to build a video service like YouTube, giving the ability to the users to upload their videos and watch them. For that purpose I am using Windows Azure StorageWindows Azure Storage and a Windows Azure Mobile App Service.

Progressive download enabled video file

Everything worked fine except one thing; When the user selected a video to watch the video couldn’t play until the whole video downloaded locally which is very frustrating especially when the video is quite big.

So I start searching for a way to make it available to the end user even if it’s not fully downloaded.
After a bit of research, one important thing about playing MP4 video file as progressive download is that the moov atom needs to be located at the beginning of the file, or else the entire file will have to be downloaded before it begins playing. The moov atom is a part of the file that holds index information for the whole file.

So, I was searching for a tool or a library available to UWP which will do that thing; Move the moov atom before the mdat atom of the video file. There are a bunch of tools out there like ffmpeg (by using a proper movflag when encoding the video) and qt-faststart which does exactly that thing.
But I couldn’t find any available to use in UWP.

First, I wrote a QueueTrigger to get the new video when it got uploaded, use ffmpeg to encode it using the faststart flag and upload it back to Azure Storage. But things got complicated for nothing.

Then, I was trying to write my own code to move the moov atom of the file at start and I did it after a bit of work. But it wasn’t working for every mp4 video file. Some video files have more atoms than others and I was too lazy to fix it.

I ended up writing a Windows Runtime Component which uses the code base of qt-faststart tool of FFmpeg, which is open source hosted on GitHub.

I adjusted it a bit to work for my purpose and that’s it! It works perfectly.

You can find it here qt-faststartUWP and use it as you want.


How to use

Simply clone the repo locally, build it and add reference to that from your project. Then use the QtFaststart class as below:


QtFaststart qt = new QtFaststart();
qt.EncodeVideoFileFromUri(storageFile.Path); //The path to the video file.

And that’s it! Your video file is ready to be streamed over the web.

Did you find it useful? Do you have any question? Write in comment below!

Thanks for reading,
George

MediaElement and MediaTransportControls — July 8, 2015

MediaElement and MediaTransportControls

Hello everyone,
hope you’re all well.

In Windows 10 SDK, the familiar to every Windows 8.1 developer, MediaElement control got some major improvements. An important improvement is the new MediaTransportControls control which allows you to enable or disable the controls of the MediaElement such as the Play/Pause button and the Seek bar.

The default MediaTransportControls

Using a MediaTransportControls control in a MediaElement is pretty simple.
The MediaElement control offers a new property with the name TransportControls which allows you to bind a customized MediaTransportControls.

The following code demonstrates a simple MediaElement control with a compact MediaTransportControls with some of the buttons hidden.

       <MediaElement AreTransportControlsEnabled="True" Source="http://static.videezy.com/system/resources/previews/000/001/611/original/1_Sunrise.mp4">
            <MediaElement.TransportControls>
                <MediaTransportControls IsCompact="True" IsZoomButtonVisible="False" IsZoomEnabled="False" IsFullWindowButtonVisible="True" IsFullWindowEnabled="False"/>

            </MediaElement.TransportControls>
        </MediaElement>
MediaElement with a customized MediaTransportControls in action

That’s it.
In my next blog post I am gonna write about a more advanced scenario, which is how to create your own extended version of the MediaTransportControls and specifically how to create a new style for it and how to add your own controls in it (for example a like button).

Thanks for reading!
George

TitleBar and Windows 10 Mobile — July 4, 2015

TitleBar and Windows 10 Mobile

Hello everyone,

Recently, I started playing a little with the new TitleBar for the UWP.
It allows you to change the colors of it (title bar and buttons), hide it to use some more space in your application or add your own custom buttons.

In my new application, Greek Wifi Finder, I just wanted to change the color of it and the code is simple and straightforward.

Windows.UI.ViewManagement.ApplicationView.GetForCurrentView().TitleBar.BackgroundColor = Color.FromArgb(100,230, 74, 25);
Windows.UI.ViewManagement.ApplicationView.GetForCurrentView().TitleBar.ForegroundColor = Colors.White;
Windows.UI.ViewManagement.ApplicationView.GetForCurrentView().TitleBar.ButtonBackgroundColor = Color.FromArgb(100, 230, 74, 25);
Windows.UI.ViewManagement.ApplicationView.GetForCurrentView().TitleBar.ButtonForegroundColor = Colors.White;

And the result is like this

Capture

As you can see, the color of the title bar changed.

Then, I tried to run the same app on my Windows 10 Mobile

Capture

The bar is still white. Well, I was pretty sure that it was not going to write my app’s name or color any button (as there isn’t any) as it does with windows, but I was hoping for it to paint the white space.
Then the Windows Phone 8.1’s StatusBar came in my mind and I tried to find it inside the Windows.UI.ViewManagement namespace but it wasn’t there.
After searching a bit, I had to add a new extension reference in my project. The Microsoft Mobile Extension SDK for Universal App Platform. You can find it under Reference Manager -> Windows Universal -> Extensions.

Voila, the StatusBar class appeared inside the Windows.UI.ViewManagement namespace.
Same logic as the TitleBar, I used the following code

Windows.UI.ViewManagement.StatusBar.GetForCurrentView().BackgroundColor = Color.FromArgb(100, 230, 74, 25);
Windows.UI.ViewManagement.StatusBar.GetForCurrentView().BackgroundOpacity = 1;
Windows.UI.ViewManagement.StatusBar.GetForCurrentView().ForegroundColor = Colors.White;

Capture

Yep that worked!
And I was pretty sure that I was ready to go now. Unfortunately, I was wrong.

I tried to run my app on Windows again and the following exception was thrown
  “Requested Windows Runtime type ‘Windows.UI.ViewManagement.StatusBar’ is not registered.”

The StatusBar class does not exist in the Windows Runtime, but the ApplicationView class exists in the Windows 10 Mobile. The only reason I can think, that Microsoft did it that way, is Windows 10 Continuum so ApplicationView will be used by phones too.
So how to fix it?

Another thing that came in my mind from the ‘old’ Windows 8.1 Universal apps was the use of pragma #ifs.
So I used something like

#if !WINDOWS_APP
    Windows.UI.ViewManagement.StatusBar.GetForCurrentView().BackgroundColor = Color.FromArgb(100, 230, 74, 25);
    Windows.UI.ViewManagement.StatusBar.GetForCurrentView().BackgroundOpacity = 1;
    Windows.UI.ViewManagement.StatusBar.GetForCurrentView().ForegroundColor = Colors.White;
#endif


even if Visual Studio doesn’t have WINDOWS_APP as a Conditional compilation symbol under the Project Properties -> Build Tab.

UPDATE
#if WINDOWS_APP is not longer supported! (SDK Version 10.0.10166)
So I used the new static class ApiInformation to check if the current device has the type we need. (StatusBar)

if (ApiInformation.IsTypePresent("Windows.UI.ViewManagement.StatusBar"))
{
    Windows.UI.ViewManagement.StatusBar.GetForCurrentView().BackgroundColor = Color.FromArgb(100, 230, 74, 25);
    Windows.UI.ViewManagement.StatusBar.GetForCurrentView().BackgroundOpacity = 1;
    Windows.UI.ViewManagement.StatusBar.GetForCurrentView().ForegroundColor = Colors.White;
}

That’s it! Everything is working now.
So the whole code I used is

Windows.UI.ViewManagement.ApplicationView.GetForCurrentView().TitleBar.BackgroundColor = Color.FromArgb(100,230, 74, 25);
Windows.UI.ViewManagement.ApplicationView.GetForCurrentView().TitleBar.ForegroundColor = Colors.White;
Windows.UI.ViewManagement.ApplicationView.GetForCurrentView().TitleBar.ButtonBackgroundColor = Color.FromArgb(100, 230, 74, 25);
Windows.UI.ViewManagement.ApplicationView.GetForCurrentView().TitleBar.ButtonForegroundColor = Colors.White;

if (ApiInformation.IsTypePresent("Windows.UI.ViewManagement.StatusBar"))
{
    Windows.UI.ViewManagement.StatusBar.GetForCurrentView().BackgroundColor = Color.FromArgb(100, 230, 74, 25);
    Windows.UI.ViewManagement.StatusBar.GetForCurrentView().BackgroundOpacity = 1;
    Windows.UI.ViewManagement.StatusBar.GetForCurrentView().ForegroundColor = Colors.White;
}

Thanks for reading!
George

Hello world! —

Hello world!

Hello everyone,
my name is George Chondrompilas, I am from Greece and this is my first ever blog post! I am a passionate developer, Microsoft Student Partner and freelancer. I am also a newbie crossfitter and a bass guitar player!
In this blog, I am gonna write about interesting stuff and tutorials on Universal Windows Platform.